Not sure where I picked up this recipe, but I’ve been meaning to make it for ages. It’s an interesting exercise in cookie making because the chocolate wafers are unleavened. One of the defining characteristics of the Oreo (or Hydrox or Newman-O etc.) is the brittleness of the cookie, almost a cracker really, and an unleavened dough needs to be treated in a particular way for these to work right. The first thing is that in order to be brittle, the cookie needs to be thin, because if it is too thick, the center remains pretty soft. but if you make it too thin, it is hard to construct the sandwich because it’s too brittle. The compromise solution is to give it a texture that allows for the dough to bake through, but still be thick enough to withstand the sandwich making operation. And you thought that texture was just to make the cookies pretty. Some further notes on the proper texture are below at the end of the recipe.
However, I do not currently have a cookie press. In desperation, I can take a page from the peanut butter cookie and use a fork to add just enough texture to allow the cookie to bake crispy all the way through, while still being thick enough to be up to the task. It’s not a perfect solution, but it does work, and makes a noticeable difference.
The Cookie Dough
Ingredients
- 1 1/8th cup sugar
- 12 Tbsp Butter, (3/4 cup)
- 1 tsp finely ground coffee
- 1/2 tsp salt
- 1 egg
- 1 tsp vanilla
- 1 Tbsp water
- 1 1/2 cup flour
- 3/4 cup dark cocoa
the steps
- Set oven to 325ºF
- Mix the sugar, butter, salt and coffee on high until the sugar lightens
- Beat in the egg, water and vanilla
- mix in the cocoa
- sift in the flour and continue beating until just well mixed.
forming the cookies
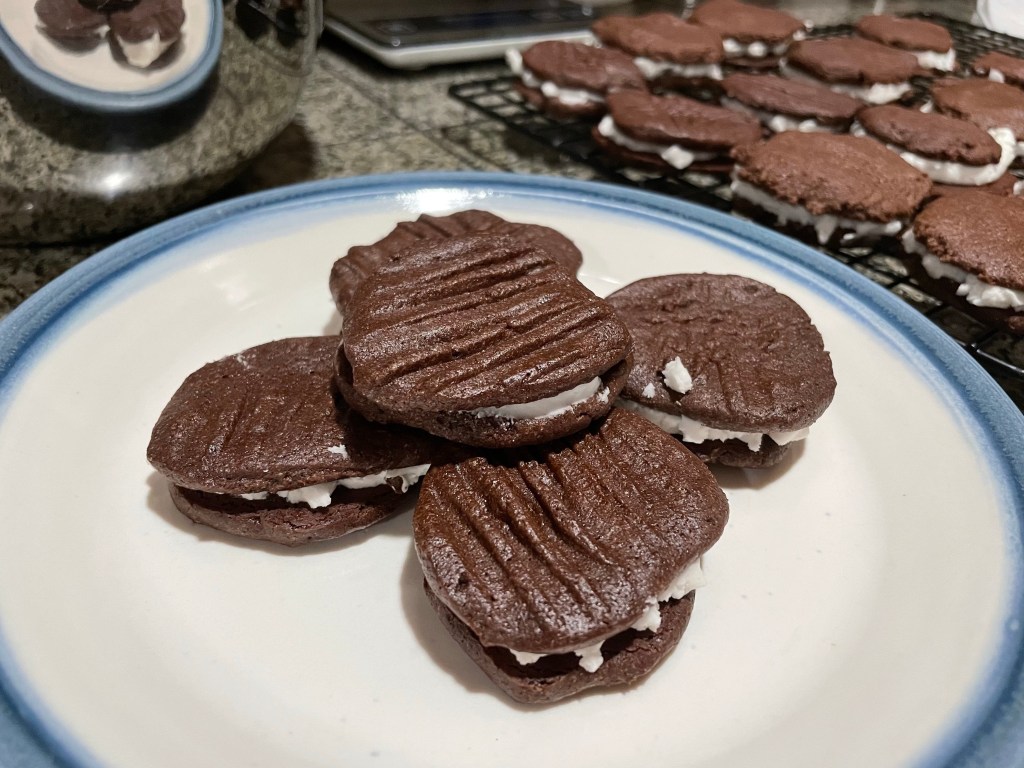
You have some options here. I got about 48 cookies out of this batch. I started by simply using a couple of teaspoons to portion out the dough onto some parchment paper on a cookie sheet, but it is a bit quite sticky, and fairly stiff. for the first few attempts, I simply wet my fingers and pressed the cookies out into a patties about 2″ or 5cm in diameter. but I realized after the first batch, that they were too soft, so for the second set, I took a fork, which I dipped in water, to press the texture you see in the picture into the cookie. This worked pretty well, but I’ll be on the lookout for a suitable stamp before I make these again. Because the dough is stiff and not particularly airy, and not leavened, the cookies pretty much remain the shape you make them as they bake. They do not melt, or sag in any way. Having some sort of fine texture is pretty important to the final cookie, so don’t skip the texturing step. Experiment though, you may prefer the softer cookie, don’t take my word for it…
An alternative way to form them is to form the dough into a cylinder about the right size, (about 1 1/2″-2″ in diameter) wrap in plastic wrap or wax paper, and place in the refrigerator until cold. Then slice the cookies off with a sharp and wet knife. this method has the advantage of uniformity, but if the dough warms up, it will start to mush when slicing, and you’re back to forming with your fingers.
Baking
Bake for 18-20 minutes at 325º. You want to get them as close to scorched without actually scorching. As noted above, they don’t alter their shape while cooking, so you can place them quite close to each other.
The Filling
Ingredients
- 1/2 cup crisco (or similar shortening. lard or butter are options, but butter might be a bit strongly flavored for this purpose.)
- 2.5 cups confectioner/powdered sugar
- 1 tsp vanilla
- ~2-4 tsp water. (varies depending on desired texture)
steps
- beat the shortening first, just to soften it. it’ll make the sugar cloud that inevitably rises when you add the sugar less dramatic anyway…
- add the vanilla and a teaspoon of the water and beat until combined
- start to add the sugar and beat to combine. while this is basically the same as simple white ‘butter’ cream frosting, it should be a bit drier than what you would frost a cake with. If it’s frosting consistency, as soon as you bite the cookie, all of the filling would squeeze out the sides.
- when all of the sugar is added, you can start adding water a half teaspoon at a time until you get the desired texture. Initially it’ll look like sand, and as you add the water, the grains will get larger and larger as it begins to hold itself together. you want to stop adding water before it becomes a smooth mixture though. you should be able to pick some up and mold it into a ball, but I wouldn’t call it ‘spreadable’. sort of like pie crust actually.
- when the cookies are cooled, add the desired amount to the flat side of one cookie, add another cookie and squeeze them together until the filling nearly reaches the edges.
I had a bit of filling left over after filling all the cookies. I ended up with nearly 48 wafers, so just shy of 2 dozen sandwiches. They did lean towards what might be considered “double-stuff” size.
A couple of notes. Another reason why the texture is important is when you are dunking these in milk. When you use wet fingers to form the cookies the surface gets sort of glossy and somewhat resistant to absorbing milk after baking. I consider this a failure in execution. It doesn’t change the flavor of the cookie, but it does lessen the pleasure of eating them like you might a normal Newman-O (or similar.) Really going to have to look for a good cookie stamp. The other reason you want the cookies to be quite brittle is so when you bite into the finished sandwich, the cookie breaks apart easily. If it doesn’t, you are going to end up with two rigid cookies mushing all the filling out of the sides. The ideal is to have the cookie crack, just as the filling is beginning to move. But, you don’t want it to completely shatter and fall apart in your hand. It’s a delicate line to walk there, but it’s worth getting it right.

