A question that has come up over and over is how do you create a template for a cone like object. Especially for the truncated cone, handy for making flower pots, mugs etc.
Turns out there’s a relatively simple geometric recipe to create such a template. here it is for your convenience.
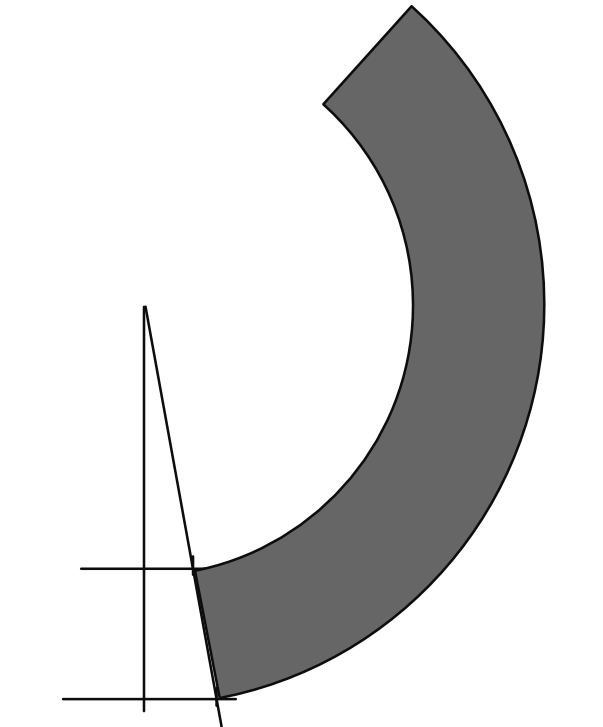
to explain, for a truncated cone:
- draw a vertical line
- at the bottom of the vertical line, draw a line perpendicular to the first one, centered on the vertical line from step one. this line should be the diameter of the wide end of the cone. you should now have an upside down ‘T’
- measure up the vertical line the height of the desired truncated cone
- at the point found in step 3, draw another line perpendicular to the vertical line, this time the length should be the diameter of the small end of the truncated cone.
- connect the ends of the horizontal lines and extend the resulting line until it crosses the vertical line. (depending on your desired cone, this could be at some considerable distance…
- with a compass, make two circles using the point where the vertical line and the line from step 5 cross as the center of the circle. the radius of these two circles should be the points where the step 5 line crosses the two horizontal lines.
- now you need to figure out the length of the perimeter of one of the ends of the truncated cone. using the horizontal line from step 2 is easiest. the formula is π times the diameter. (chances are that the scale is small enough that using 22/7 is probably not a bad idea)
- with a flexible tape measure, measure out along the circle line the distance calculated in step 7
- 9 draw a straight line between the point found in step 8 and the point found in step 5
at this point you’re done. as you can see in the diagram above, the resulting grey area can be cut out and developed into a cone shape.
if requested, I can turn this into a series of visual steps…

